I recently attended the intermediate installation course hosted by the National Wood Flooring Association (NWFA) in Seattle, WA. The NWFA is the gold standard for everything wood flooring related in North America ranging from manufacturing, sales, and installation.
The intermediate installation course is a 3-day event which covers step by step installation techniques for nail down, glue down, and floating installation.
Day 1:
After arriving in a class of 15 attendees and 5 instructors we start with an overview of technical training. Lead instructor, Todd McDonald, is an NWFA Education & Research Foundation Board of Directors. This course assumes we have gone through the basic installation course which covers things such as the difference between solid and engineered hardwood. In this course we briefly recap previous topics and quickly enter into the more technical side of subfloor prep. Sub floor prep is the most important aspect of a successful flooring project. The NWFA recommends sub floor flatness to be ¼” in 10’ over wood subfloor and 3/16” flatness over concrete subfloor. The other thing that stood out to me is measuring wood moisture content and subfloor moisture content. This is an important aspect to protect installers from other issues unrelated to installation such as manufacturing or environmental change after installation is complete. Before installation, moisture content of the wood and subfloor should be within 3% of each other. A lot of responsibility rests on installer’s shoulders therefore it is of paramount importance to protect yourself, your employees, and your clients from flooring failure.
Day 2:
On the second day of training, we start the more hand-on aspect. Installation is separated into several stations from nail down, to glue down, and floating each approximately a 10’ x 20’ section. The instructors start by showing us how to level a subfloor using leveling compound and allowing this ample time to dry while we move on to the rest of the installation methods. After mixing and pouring the compound, we are instructed to skim and spread the compound to allow for evenness. To check the concrete for humidity we want to perform the water droplet test to see if this concrete can sufficiently absorb the adhesive which will be used later-on. During the nail down session, we focused specifically on creating a primary line and eventually a working line. The purpose of the primary line is to center the room and ensure a balanced visual when the install is complete. Working lines are different depending on the layout of the flooring such as diagonal lay etc. Once we got moving, the more experienced installers can go at a much quicker pace, however, the instructors did a great job of pointing out the importance of nail pattern and PSI settings and even experienced students can improve their craft. Since most contractors are using pneumatic nailers nowadays, the settings will vary based on the wood species and construction of the product. This is important for the installer to calibrate properly and ensure the nails are driven into the wood at the perfect pressure. Nails too deep will cause tongue breakage and nails too shallow will cause visible gaps when installing the next row.
 Day 3:
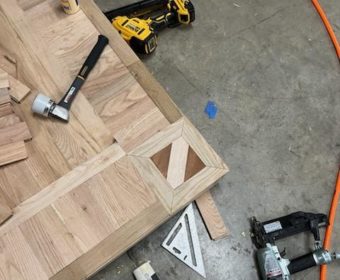
On the last day of training we moved to the most advanced techniques. I have been in the flooring industry for over a decade and most of the things we learn on the 3rd day is new to me. We started by installing borders for our flooring which includes specialized patterns on each corner and eventually moved to herringbone and chevron patterns in the layout. The use of routers and splines are very common in this step. When installing these specialized patterns we must make very precise cuts using small planks of wood, therefore, the difficulty and dangers of using the saw is higher. Although these specialized installation techniques are not as common on jobsites, the ability to do this work is what separates the true craftsman from a typical flooring installer. Some of the tricks we learned while doing these patterns can teach you to overcome some hurdles on the jobsite for making specialized transition moldings etc. To become a master in your craft, these are things you want to have in your portfolio for high-end projects that are willing to pay top dollar. It shows a true passion and dedication to the art of flooring. What separates an experienced installer from a beginner is the specialized tools and tricks they use.
In our downtime and during the lunch hour, we have an opportunity to compare notes with other installers about techniques and running an installation business. Most people I met at this event were from the Pacific Northwest. I also met people from Minnesota, Michigan, and New Jersey. I learned that installation costs vary quite a bit depending on region, skill level, and size of business. When running an installation business, it is important to grow your customer base and improve your skill level if you expect to make top dollar for your work. While many installers offer free estimates, some charge up to $100 for an in-home consultation. This cost is applied towards the final bill, if the bid is accepted and offers a more targeted approach for obtaining clients. One area I wish we would have covered during my time there is how to write up estimates and go through some examples of how an estimate is written up as I feel this is an area that is important for professionalism and transparency. By providing an estimate with line items for each task we will perform such as installation, flooring removal, and custom work this improves overall customer satisfaction. The lessons I learned and people I met will help me through the rest of my career and I would encourage any floor installers, project managers, or business owners who wants to take their game to the next level to attend this course.