
So you are about to install your new hardwood flooring and are wondering if you should remove your baseboard first? There are a few factors you should consider before getting started:
- How your current baseboards are installed
- Height of current baseboards
- What you want the finished product to look like
- Condition of the existing baseboards
Generally, it’s a good idea to remove baseboards before installing your flooring, here’s why:
- The finished product might look better.
Short baseboards give a better-finished look, aesthetically without shoe molding or quarter round. However, with tall profile baseboards, shoe molding may enhance the decor.
- Matchup to the same height of your wood floors
The height of your new hardwood flooring may not be the same height as your previous floor covering, therefore, the height of the baseboards would need to be adjusted accordingly.
Tools Needed
- Utility Knife
- Pry bar
- Scrap piece of wood
- Hammer
- Pliers
Removing the Baseboard
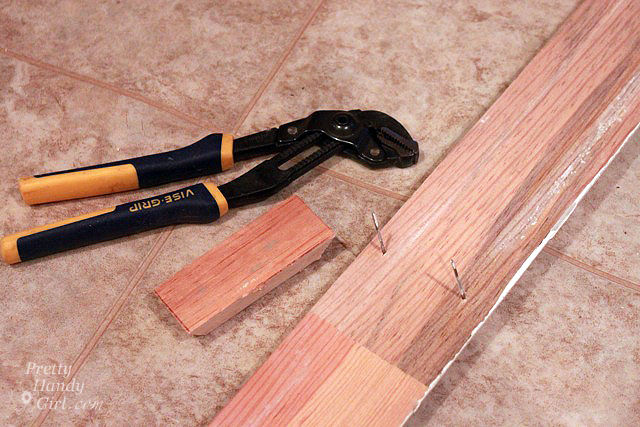
To remove the baseboard, begin by slicing any caulk that may be sealing the baseboard with your wall. Wedge enough of an opening to slide your pry bar behind the baseboard. Once your pry bar is secure, place the scrap piece of wood above/behind the pry bar. The block of wood will act as a buffer between the pry bar and your wall and will help protect your wall from any possible damage. Next, gently pry and work down the length of the baseboard to slowly loosen from the wall. When you get to an area of increased resistance (most likely from a nail), pry slowly until you feel the nail has been removed from the wall. Take your time and work throughout the entire length of the baseboard. You do not want to remove one side before the other; this can cause damage to the molding.
Once you have a section of baseboard off use pliers to pull the nails out from the back side of the boards in a twisting motion. This will help disguise any holes in the face of the board.
Pro Tip: If you number each piece of the baseboard, and the wall it came off of after the new flooring is installed, it can be easily matched.
Once the baseboard has been removed, it is time to install your hardwood floor. After the floor is installed, reinstall your baseboards, touch up, and caulk where needed.
Why would I want to leave the baseboards on?
 Your existing baseboard is not in the best shape and could be broken during removal
- The baseboards were glued to the drywall and could prove difficult to remove without damage
- You have no time to remove the baseboards and want a quick solution to finish the project
If you have decided you do not want to remove the baseboard moldings, you can follow these steps.
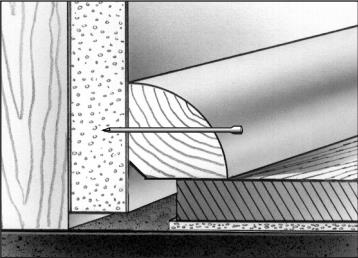
When installing wood flooring you are required to leave an expansion gap of approx the thickness of the flooring around the edges of the room. This gap will help ensure your flooring has enough room to expand and contract throughout the seasons.
Install the base shoe/quarter-round molding over the expansion gap created by your new hardwood flooring. When attaching the base shoe/quarter round, nail the molding into the bottom of the existing baseboard and not into the flooring itself. Fill any nail holes and apply any touch-ups as needed.
For more inquiries, please check out our local services page!